1 通用方案
1.1 方案综述
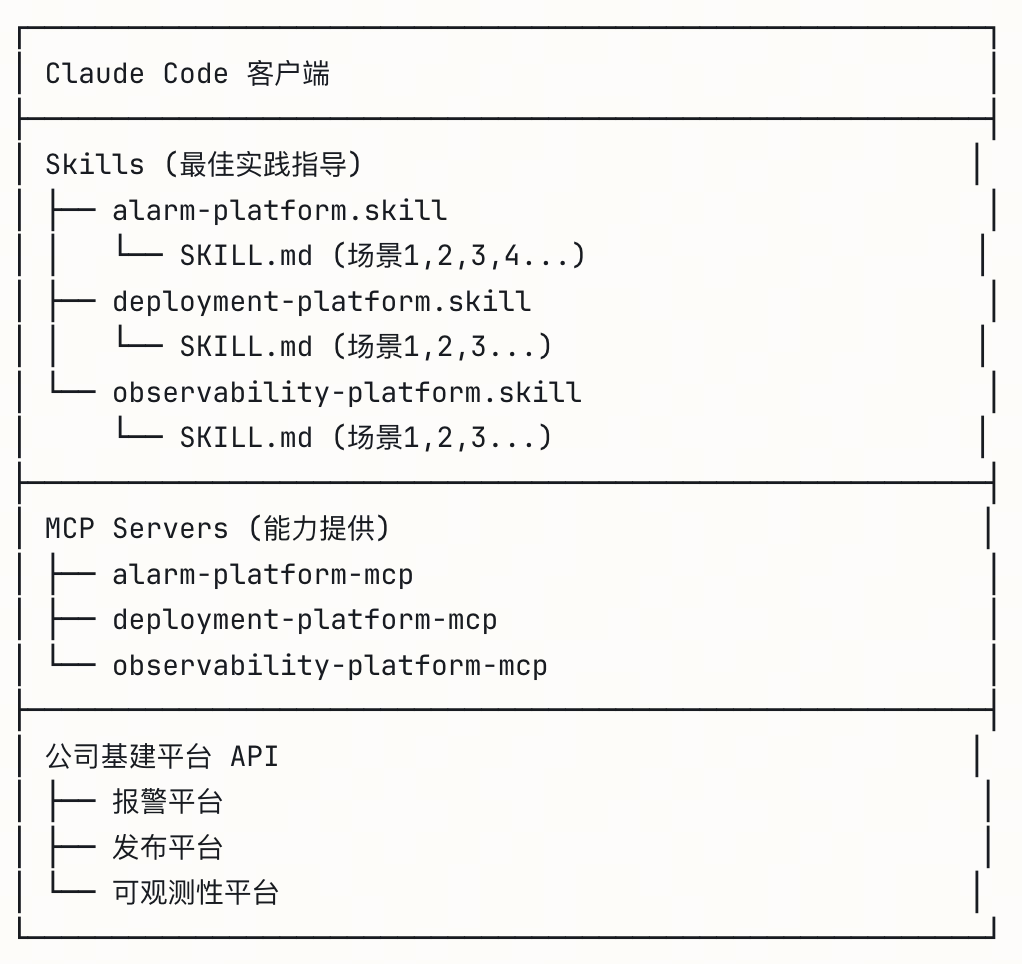
Claude Code接入公司基建平台方案思路都是是一样的(比如报警平台、发布平台等):公司基础平台提供一套MCP,然后Claude Code为每个一个平台定义一个Skill,通过skill.md划分了所有场景操作。
- ✅ 公司基建平台 → 提供一套 MCP Server
- ✅ Claude Code → 为每个平台定义一个 .skill 文件
- ✅ SKILL.md → 划分该平台的所有使用场景和最佳实践
|
1 2 3 4 5 6 7 8 9 10 11 12 13 14 15 16 17 18 |
报警平台.skill └── SKILL.md ├── 场景1: 处理紧急告警 ├── 场景2: 配置告警规则 ├── 场景3: 分析告警趋势 └── 场景4: 值班交接流程 发布平台.skill └── SKILL.md ├── 场景1: 紧急回滚 ├── 场景2: 金丝雀发布 └── 场景3: 多区域发布 配置中心.skill └── SKILL.md ├── 场景1: 安全变更配置 ├── 场景2: 配置回滚 └── 场景3: 动态配置更新 |
分层架构
1.2 最优实践建议
最优方案:一个平台 = 一个 .skill 文件 = 多个使用场景
例外情况:只有当平台非常复杂,且有明确的子模块边界时,才考虑拆分。
对于公司的报警平台、发布平台、配置中心等,99% 的情况下都应该是一个平台对应一个 .skill 文件。🎯
✅ 推荐:默认一个平台一个 Skill。理由:
- 简单原则:除非有明确理由,否则不要拆分
- 用户体验:安装一次就能使用所有功能
- 维护成本:一个文件更容易维护和更新
- Claude 理解:能完整了解平台能力,做出更好的决策
⚠️ 拆分的信号。只有当你发现:
- 不同团队维护不同模块
- 某些功能需要特殊权限(分开分发)
- 单个 SKILL.md 已经超过 800 行
- 用户反馈”功能太多,找不到我需要的”
2 举例
2.1 报警平台
流程
|
1 2 3 4 5 |
报警平台 API ↓ 封装 alarm-mcp (提供工具函数) ↓ 指导使用 alarm.skill (告诉 Claude 何时、如何使用这些工具) |
alarm.skill/SKILL.md 示例:
|
1 2 3 4 5 6 7 8 9 10 11 12 13 14 15 16 17 18 19 20 21 22 23 24 |
# 报警平台 Skill ## 前置条件 - 已配置 alarm-mcp - 拥有平台访问权限 ## 场景1: 处理线上告警 触发条件:收到 P0/P1 告警通知 标准流程: 1. 使用 query_alerts(severity="P0") 查询当前告警 2. 使用 get_alert_detail(alert_id) 获取详情 3. 分析影响范围 4. 使用 ack_alert(alert_id) 确认处理 5. 执行修复措施 6. 验证告警消除 注意事项: - P0 告警需在 15 分钟内响应 - 重大故障需同时拉会议室 - 处理完成后记得填写复盘 ## 场景2: 新服务配置监控 ... |
2.2 发布平台
流程
|
1 2 3 4 5 |
发布平台 API ↓ 封装 deployment-mcp (提供工具函数) ↓ 指导使用 deployment.skill (告诉 Claude 发布的标准流程) |
deployment.skill/SKILL.md 示例:
|
1 2 3 4 5 6 7 8 9 10 11 12 13 |
# 发布平台 Skill ## 场景1: 紧急回滚 触发条件:生产环境出现严重问题 标准流程: 1. 使用 get_current_version() 确认当前版本 2. 使用 list_versions() 查看历史版本 3. 使用 rollback(version) 执行回滚 4. 使用 check_health() 验证服务状态 ## 场景2: 金丝雀发布 ... |
3 会有把一个平台拆成多个.skill场景吗,还是最优方案就是Claude Code 为每个平台定义一个 .skill 文件?
3.1 情况1:大多数情况 – 一个平台一个 Skill ✅ (推荐)
适用于:
- 中小型平台
- 功能相对聚焦的平台
- 场景之间有较强关联性
示例:
|
1 2 3 4 5 6 |
alarm-platform.skill ← 一个 Skill 包含所有告警场景 ├── SKILL.md ├── 场景1: 处理告警 ├── 场景2: 配置规则 ├── 场景3: 分析趋势 └── 场景4: 值班管理 |
优点:
- 简单清晰,易于管理
- 用户只需安装一个 Skill
- Claude 能看到完整的平台能力
3.2 情况2:复杂平台拆分多个 Skills ⚠️ (特殊情况)
何时需要拆分:
标准1:用户群体不同
|
1 2 3 4 5 6 7 8 9 10 11 12 |
kubernetes-platform-mcp (一个 MCP Server) ├── k8s-dev.skill ← 开发人员使用 │ └── SKILL.md │ ├── 部署应用 │ ├── 查看日志 │ └── 调试 Pod │ └── k8s-ops.skill ← 运维人员使用 └── SKILL.md ├── 集群管理 ├── 节点维护 └── 资源配额 |
标准2:场景完全独立,没有交叉
|
1 2 3 4 5 6 7 8 9 |
data-platform-mcp (一个 MCP Server) ├── data-query.skill ← 数据查询分析 │ └── SKILL.md (SQL查询、报表生成) │ ├── data-pipeline.skill ← 数据管道开发 │ └── SKILL.md (ETL开发、调度配置) │ └── data-governance.skill ← 数据治理 └── SKILL.md (权限管理、血缘分析) |
标准3:平台过于庞大(10+ 场景)
|
1 2 3 4 5 |
cloud-platform-mcp (一个超大型 MCP) ├── cloud-compute.skill ← 计算资源 (5个场景) ├── cloud-storage.skill ← 存储管理 (4个场景) ├── cloud-network.skill ← 网络配置 (6个场景) └── cloud-security.skill ← 安全策略 (5个场景) |
3.3 决策树
|
1 2 3 4 5 6 7 8 9 |
你的平台是否满足以下任一条件? ├─ 场景数量 > 10 个? ├─ 不同用户群体使用不同功能? ├─ 场景之间完全独立,没有交叉? ├─ 单个 SKILL.md 超过 1000 行? │ YES → 考虑拆分成多个 Skills │ NO → 使用一个 Skill (推荐) |
4 感知
4.1 是否需要感知
使用Claude Code生成代码之后,想要打通公司发布平台类似jeckins,是不是直接通过Mcp生成一个任务,然后嵌入这个任务页面就行了,还需要感知发布流水线中每个节点状态吗?
4.1.1 场景 1:Fire-and-forget(触发即走)
- Claude Code 生成代码后,通过 MCP 触发 Jenkins job
- 只需要确认任务创建成功即可
- 适用于:不需要立即反馈结果的场景
4.1.2 场景 2:闭环反馈(推荐)
- 触发任务后,需要感知流水线状态
- 监控各个节点(构建、测试、部署)的执行情况
- 适用于:需要确认发布成功或失败时采取后续行动
4.1.3 两种场景时间对比
Fire-and-forget方案
|
1 2 3 4 5 |
用户: "部署到 staging" Claude Code: → 调用 trigger_deploy() [2秒] → 返回 "✅ 部署已触发,Build #1234" 总耗时: ~2-3 秒 ⚡ |
闭环反馈方案(Skill 轮询),相比Fire-and-forget方案要较长时间的等待。
|
1 2 3 4 5 6 7 8 9 |
用户: "部署到 staging 并等待完成" Claude Code: → 调用 trigger_deploy() [2秒] → sleep 20秒 → 调用 get_status() [1秒] → sleep 30秒 → 调用 get_status() [1秒] → ... (重复 10 分钟) 总耗时: ~10 分钟 🐢场景决策 |
4.1.4 场景决策
场景1 需要快速迭代开发 (✅Fire-and-forget更好)
|
1 2 3 4 5 6 |
开发者: "修复 bug 然后部署" → 期望:快速提交代码,继续开发其他功能 → 不想等待 10 分钟看部署结果 → 可以稍后检查 Jenkins UI 最佳方案: Fire-and-forget |
场景2 发布阶段(✅ 闭环反馈更好)
| 场景 | 模式 | 耗时 | 适用情况 |
|---|---|---|---|
| 快速开发迭代 | Quick (Fire-and-forget) | 2-5秒 ⚡ | “部署到 staging” |
| 生产发布 | Monitored (闭环反馈) | 5-20分钟 🔍 | “部署到生产并确认” |
自动识别
|
1 2 3 4 5 6 7 8 9 10 |
// Skill 会根据用户意图自动选择模式 "Deploy to staging" → Quick Mode (开发者想继续工作) "Deploy to production and confirm" → Monitored Mode (需要确认结果) "Deploy and wait for it" → Monitored Mode (明确要等待) |
4.1.5 最佳实践-两种模式都支持的skill
最佳实践是两种模式都支持,根据用户意图自动选择:
|
1 2 3 4 5 6 7 8 9 10 11 12 13 14 15 16 17 18 19 20 21 22 23 24 25 26 27 28 29 30 31 32 33 34 35 36 37 38 39 40 41 42 43 44 45 46 47 48 49 50 51 52 53 54 55 56 57 58 59 60 61 62 63 64 65 66 67 68 69 70 71 72 73 74 75 76 77 78 79 80 81 82 83 84 85 86 87 88 89 90 91 92 93 94 95 96 97 98 99 100 101 102 103 104 105 106 107 108 109 110 111 112 113 114 115 116 117 118 119 120 121 122 123 124 125 126 127 128 129 130 131 132 133 134 135 136 137 138 139 140 141 142 143 144 145 146 147 148 149 150 151 152 153 154 155 156 157 158 159 160 161 162 163 164 165 166 167 168 169 170 171 172 173 174 175 176 177 178 179 180 181 182 183 184 185 186 187 188 189 190 191 192 193 194 195 196 197 198 199 200 201 202 203 204 205 206 207 208 209 210 211 212 213 214 215 216 217 218 219 220 221 222 223 224 225 226 227 228 229 230 231 232 233 234 235 236 237 238 239 240 241 242 243 244 245 246 247 248 249 250 251 252 253 254 255 256 257 258 259 260 261 262 263 264 265 266 267 268 269 270 271 272 273 274 275 276 277 278 279 280 281 282 283 284 285 286 287 288 289 290 291 292 293 294 295 296 297 298 299 300 301 302 303 304 305 306 307 308 309 310 311 312 313 314 315 316 317 318 319 320 321 322 323 324 325 326 327 328 329 330 331 332 333 334 335 336 337 338 339 340 341 342 343 344 345 346 347 348 349 350 351 352 353 354 355 356 357 358 359 360 361 362 363 364 365 366 367 368 369 370 371 372 373 374 375 376 377 378 379 380 381 382 383 384 385 386 387 388 389 390 391 392 393 394 395 396 397 398 399 400 401 402 403 404 405 406 407 408 409 410 411 412 413 414 415 416 |
--- name: jenkins-deploy-smart description: "Smart Jenkins deployment with two modes: quick-trigger (fire-and-forget) for rapid development, and monitored-deploy (closed-loop) for critical releases. Automatically detects user intent from their request." --- # Smart Jenkins Deployment Skill This skill provides **TWO deployment modes** based on user intent: 1. **Quick Mode** (Fire-and-forget) - Trigger and move on 2. **Monitored Mode** (Closed-loop) - Wait for completion --- ## Mode Detection ### Automatic Detection from User Intent Analyze the user's request to determine which mode they want: #### Quick Mode Triggers 🚀 Use when user says: - "deploy" / "push" (without "wait" or "monitor") - "trigger deployment" - "kick off a build" - "deploy and I'll check later" - "deploy in the background" - Environment is **dev** or **staging** (default to quick) **Example:** ``` User: "Fix the login bug and deploy to staging" → Quick Mode (they want to continue working) ``` #### Monitored Mode Triggers 🔍 Use when user says: - "deploy **and wait**" - "deploy **and monitor**" - "deploy **and confirm**" - "make sure deployment **succeeds**" - "deploy **and let me know**" - Environment is **production** (always monitor) - Part of multi-step workflow that needs confirmation **Example:** ``` User: "Deploy v2.1.0 to production and confirm it's live" → Monitored Mode (they need confirmation) ``` --- ## Quick Mode (Fire-and-forget) ### Workflow ```javascript 1. Trigger deployment 2. Get build ID 3. Report to user with tracking info 4. DONE (don't wait) Total time: 2-5 seconds ⚡ ``` ### Implementation ```javascript // 1. Trigger const result = await mcp.jenkins.trigger_deploy({ repo, branch, environment }); // 2. Report and exit console.log(`✅ Deployment triggered: Build #${result.buildId}`); console.log(` Environment: ${environment}`); console.log(` Monitor: ${result.queueUrl}`); console.log(`\n💡 I'll continue with other tasks. You can check status anytime by asking:`); console.log(` "Check status of build ${result.buildId}"`); // 3. DONE - no polling! return { mode: "quick", buildId: result.buildId, status: "triggered" }; ``` ### User Experience ``` User: "Deploy the auth fixes to staging" Claude: ✅ Deployment triggered: Build #1234 Environment: staging Monitor: https://jenkins.../queue/item/5678/ 💡 I'll continue with other tasks. You can check status anytime by asking: "Check status of build 1234" [Claude is free to do other work immediately] ``` --- ## Monitored Mode (Closed-loop) ### Workflow ```javascript 1. Trigger deployment 2. Wait 20 seconds (initial delay) 3. Poll status every 15-30 seconds 4. Report progress periodically 5. Wait for completion (SUCCESS/FAILURE) 6. Handle result Total time: 5-20 minutes 🐢 ``` ### Implementation ```javascript // 1. Trigger const result = await mcp.jenkins.trigger_deploy({ repo, branch, environment }); console.log(`✅ Deployment triggered: Build #${result.buildId}`); console.log(` This will take approximately ${Math.floor(result.estimatedDuration/60)} minutes`); console.log(` Monitoring until completion...\n`); // 2. Initial wait await sleep(20); // 3. Polling loop (full implementation from previous skill) const startTime = Date.now(); let checkCount = 0; while (true) { checkCount++; const status = await mcp.jenkins.get_build_status({ buildId }); // Check completion if (status.status === "SUCCESS") { const duration = Math.floor((Date.now() - startTime) / 1000); console.log(`\n✅ Deployment successful! (${formatDuration(duration)})`); break; } if (status.status === "FAILURE") { console.log(`\n❌ Deployment failed at stage: ${status.stage}`); await handleFailure(status); break; } // Report progress every 3 checks if (checkCount % 3 === 0) { console.log(`⏳ ${status.status} (${status.stage}) - ${formatDuration(elapsed)}`); } // Continue polling const interval = getIntervalForStage(status.stage); await sleep(interval); } ``` --- ## Smart Mode Selection Examples ### Example 1: Development Flow ``` User: "Add rate limiting to the API and deploy" Claude detects: - No explicit "wait" or "monitor" keywords - Context suggests iterative development - Environment likely staging/dev → Uses QUICK MODE Claude: [adds rate limiting code] [commits changes] ✅ Deployment triggered: Build #1234 Done! Build is running in background. What would you like me to work on next? ``` ### Example 2: Production Release ``` User: "Deploy version 2.5.0 to production" Claude detects: - Environment: production - Production = always monitor → Uses MONITORED MODE Claude: ⚠️ PRODUCTION DEPLOYMENT Triggering build for v2.5.0... ✅ Build #1234 started ⏳ Compiling... (1m 30s) ⏳ Testing... (4m 15s) ⏳ Deploying... (6m 45s) ✅ Deployment successful! (8m 12s) 🎉 Version 2.5.0 is now live in production! ``` ### Example 3: Explicit Request ``` User: "Deploy to staging and let me know when it's done" Claude detects: - Keywords: "let me know when it's done" - User explicitly wants confirmation → Uses MONITORED MODE Claude: ✅ Deployment triggered Monitoring until completion... [waits 10 minutes] ✅ Deployment complete! Staging is updated. ``` ### Example 4: Check Later Pattern ``` User: "Trigger a staging deployment, I'll check it later" Claude detects: - Keywords: "I'll check it later" - User doesn't want to wait → Uses QUICK MODE Claude: ✅ Triggered: Build #1234 You can check status later with: "What's the status of build 1234?" ``` --- ## Status Check Command (On-Demand) Allow users to check status anytime, even in Quick Mode: ```javascript // User can ask later: User: "What's the status of build 1234?" // OR User: "Check my latest deployment" // Claude responds: const status = await mcp.jenkins.get_build_status({ buildId: 1234 }); if (status.status === "SUCCESS") { console.log("✅ Build 1234 completed successfully 2 minutes ago"); } else if (status.status === "RUNNING") { console.log("⏳ Build 1234 still running (testing stage)"); console.log(" Started 5 minutes ago, ~3 minutes remaining"); } else if (status.status === "FAILURE") { console.log("❌ Build 1234 failed 1 minute ago"); await handleFailure(status); } ``` --- ## Production Safety Rules **ALWAYS use Monitored Mode for production**, regardless of user phrasing: ```javascript if (environment === "production") { console.log("⚠️ Production deployment detected"); console.log(" Using monitored mode for safety"); // Force monitored mode mode = "monitored"; // Extra confirmation console.log("\n❓ Confirm deployment to production? (yes/no)"); // Wait for user confirmation before proceeding } ``` --- ## Timeout Handling in Monitored Mode Even in Monitored Mode, respect user's time: ```javascript const MAX_DURATION = environment === "production" ? 20 * 60 : 15 * 60; if (elapsed > MAX_DURATION) { console.log(`⏰ Deployment exceeded ${MAX_DURATION/60} minute timeout`); console.log(`\n🤔 Options:`); console.log(` 1. Build may still complete - check: ${url}`); console.log(` 2. Build might be stuck - consider aborting`); console.log(` 3. I can continue monitoring if you want`); console.log(`\nWhat would you like to do?`); // Wait for user decision: // - "keep monitoring" → extend timeout // - "check later" → switch to quick mode // - "abort" → abort build } ``` --- ## Mode Switching Allow users to switch modes mid-flight: ```javascript // User triggers in quick mode User: "Deploy to staging" Claude: "✅ Triggered: Build #1234" // User changes mind User: "Actually, wait for it to complete" Claude: "Sure! Switching to monitored mode..." → [starts polling build #1234] // OR opposite direction User: "Deploy and monitor" Claude: "✅ Triggered, monitoring..." ⏳ Running... (2m 30s) User: "Never mind, I'll check later" Claude: "Got it! Stopping monitoring." "Build #1234 is still running. Check status anytime." ``` --- ## Summary Table | Aspect | Quick Mode 🚀 | Monitored Mode 🔍 | |--------|---------------|-------------------| | **Time** | 2-5 seconds | 5-20 minutes | | **Polling** | No | Yes (adaptive) | | **User can continue** | Immediately | After completion | | **Best for** | Development | Production, CI/CD | | **API calls** | 1 | 20-60 | | **User feedback** | Trigger confirmation + URL | Full progress + result | | **Failure handling** | Manual (user checks) | Automatic diagnosis | --- ## Implementation Priority When implementing, follow this priority: 1. ✅ **Detect user intent** (keywords, environment) 2. ✅ **Default to Quick Mode** for dev/staging 3. ✅ **Force Monitored Mode** for production 4. ✅ **Allow explicit override** ("wait", "monitor") 5. ✅ **Provide status check** command for Quick Mode 6. ✅ **Support mode switching** if user changes mind --- ## Key Benefits ### Quick Mode Benefits - ⚡ **Fast turnaround** - developer stays in flow - 💰 **Lower cost** - fewer API calls - 🔄 **Parallel work** - deploy while coding next feature - 😊 **Better UX** - no forced waiting ### Monitored Mode Benefits - ✅ **Guaranteed feedback** - know it succeeded - 🛡️ **Safety** - catch failures immediately - 🔧 **Auto-diagnosis** - Claude analyzes logs - 📊 **Full metrics** - deployment time, stages, etc. ### Best of Both Worlds - 🎯 **Intent-based** - right mode for the situation - 🔀 **Flexible** - can switch modes - 🎛️ **User control** - explicit overrides available - 📈 **Optimized** - minimal waste in both modes --- ## Conclusion **The key insight**: Polling/waiting is NOT always bad! - ❌ Bad: Forcing 10-minute wait when user wants to continue coding - ✅ Good: 10-minute wait when user needs confirmation for production - 🎯 Perfect: Let the user (or context) decide which mode to use By supporting both modes, you get: - Developer productivity (Quick Mode) - Deployment confidence (Monitored Mode) - Intelligent defaults (auto-detection) - User control (explicit overrides) |
4.2 方案-轮询模式(Polling Pattern)
4.2.1 方案描述
最常见的实现方式,Claude Code 主动查询状态:
|
1 2 3 4 5 6 7 8 9 10 11 12 13 14 15 16 17 18 19 20 21 22 |
// Jenkins MCP 服务器示例 class JenkinsMCPServer { // 1. 触发部署 async triggerDeploy(params) { const build = await jenkins.build(params); return { buildId: build.id, status: "started" }; } // 2. 轮询状态 - Claude Code 会反复调用 async getBuildStatus(buildId) { const build = await jenkins.getBuild(buildId); return { buildId, status: build.status, // running/success/failure stage: build.currentStage, logs: build.recentLogs }; } } |
Claude Code 会自动执行类似逻辑:
|
1 2 3 4 5 |
1. 调用 MCP 工具触发部署 2. Sleep 5-10 秒 3. 再次调用 MCP 工具查询状态 4. 如果未完成,继续循环 5. 直到成功/失败/超时 |
4.2.2 如何实现轮询
这个轮询操作是通过Claude Code 的自主loop轮询机制来完成的,可以通过skill来强化这个步骤。Skill 文档中写明:
|
1 2 3 |
"初始等待 20 秒" "测试阶段每 30 秒检查一次" "最多等待 15 分钟" |


